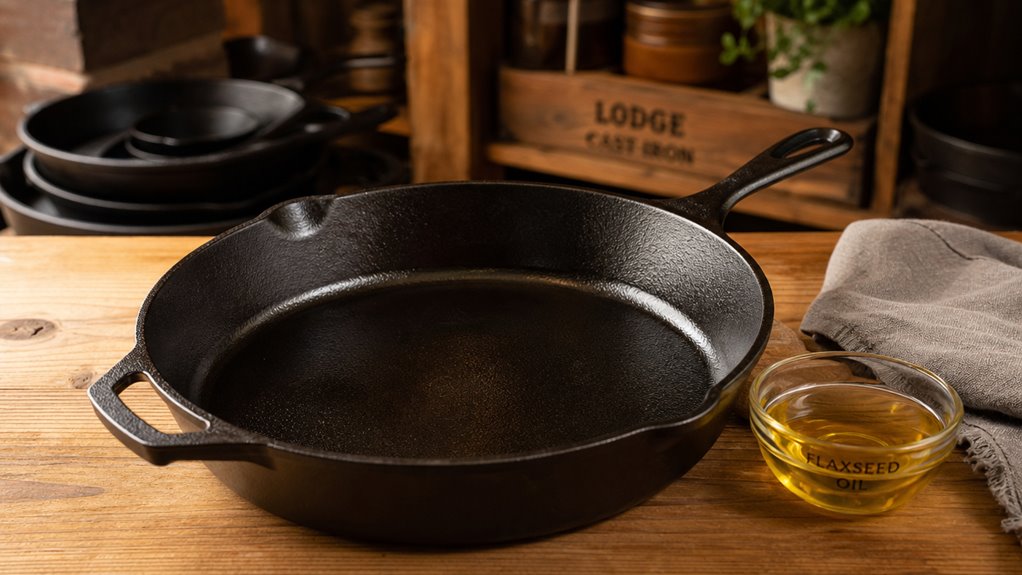
Seasoning cast iron requires building thin layers of polymerized oil directly onto the metal surface to create a durable, non-stick coating. Each layer bonds through heat, forming a protective film that resists rust and improves with regular use.
- High-smoke-point oil determines how well each seasoning layer polymerizes, with options like canola or grapeseed oil providing the heat tolerance the process requires.
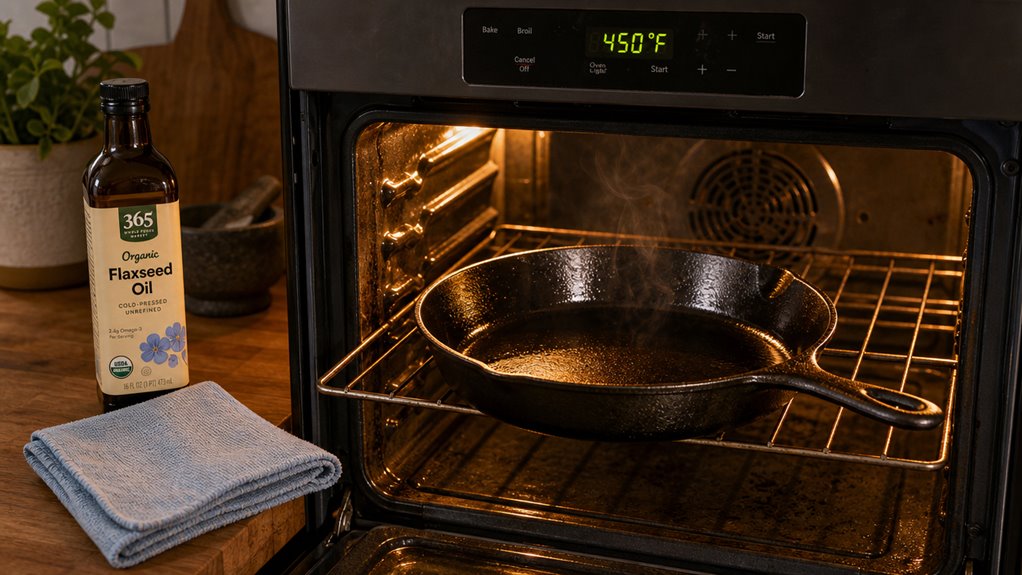
- Oven temperature drives the chemical reaction that converts liquid oil into a hard, bonded coating, typically set to 450–500 °F to exceed the oil’s smoke point.
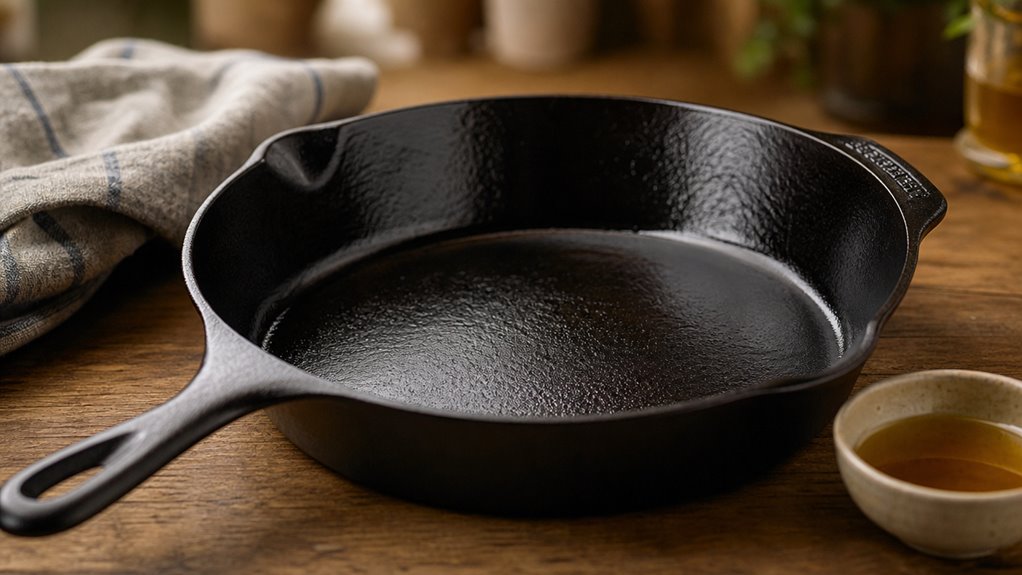
- Polymerized film builds gradually across multiple bake cycles, producing a uniformly matte black surface that becomes more resilient over time.
Applying oil correctly matters as much as choosing the right type. A coat should leave only a faint sheen on the surface, with all excess wiped away before the pan enters the oven. Too much oil pools and bakes into a sticky, uneven layer rather than a smooth bond.
The baking process runs for roughly one hour with the pan placed upside-down, allowing oil to cure evenly without pooling inside the cooking surface. Cooling happens inside the turned-off oven, which lets the polymerized film set gradually without thermal shock. Repeating this cycle two or three additional times strengthens the seasoning foundation.
Maintenance after each use preserves the seasoning layer. Rinsing with warm water, drying immediately, and applying a razor-thin oil layer while the pan is still warm keeps the polymerized film sealed against moisture and oxidation.
Cast iron seasoning relies on a process called polymerization, in which fatty acid chains in cooking oil cross-link under heat into a solid plastic-like compound. That reaction typically begins at temperatures roughly 25 °F above the oil’s smoke point.
Cheap or expensive is the wrong question. Cost per use is the honest one. Check out our new Calculator.
Cost-Per-Use Calculator →The full method comes down to a short, repeatable cycle:
- Clean and dry the pan. Start with a bare, fully dry surface so moisture cannot interrupt the bond.
- Apply a thin coat of high-smoke-point oil. Use grapeseed, canola, or plain vegetable oil, then wipe until only a faint sheen remains.
- Bake upside-down at 450 to 500 °F for about one hour. This drives the oil past its smoke point so the film polymerizes into a hard layer.
- Cool the pan inside the turned-off oven. A gradual cool-down lets the layer set without thermal shock.
- Repeat three to four times, then maintain. Build several thin layers, and after each use rinse, dry, and wipe on a razor-thin oil coat while the pan is still warm.
Key Points
- Clean the pan, dry it completely, and apply a thin, even coat of high‑smoke‑point oil (≈¼ tsp) to all surfaces.
- Wipe excess oil until the pan shows a faint sheen, preventing pooling and tackiness.
- Bake upside‑down at 450‑500 °F (≈25 °F above the oil’s smoke point) for one hour, then let it cool inside the turned‑off oven.
- Repeat the thin‑coat, bake, and cool cycle at least three times (four if the surface looks patchy) to build a durable, matte polymerized layer.
- After each use, rinse with warm water, dry promptly, and apply a razor‑thin oil coat while still warm to maintain the seasoning and prevent rust.
What It Means to Season Cast Iron So the Layer Actually Lasts

Seasoning cast iron means building a thin, polymerized oil layer that bonds to the pan’s surface and creates a durable, low-stick coating, and how that layer forms determines whether it lasts.
Heat in the range of 450 to 500 degrees Fahrenheit drives oil molecules to cross-link into a solid film rather than remaining a liquid residue. Wiping off excess oil before each bake keeps the coating thin and uniform, because a heavy application tends to stay tacky and eventually peels away instead of curing properly.
The micro-cavities in a sand-cast surface lock the polymerized film in place, which is why several light coats typically outlast a single thick one. The factors that influence how well a seasoning holds up over time go deeper than oven temperature alone. Uniform coating ensures even polymerization across the surface.
The Polymerized Oil Layer That Makes Lodge Cast Iron Non-Stick
Seasoning a Lodge skillet means turning a thin film of oil into a hard, plastic‑like coating that actually sticks to the metal. When you heat the oil past its smoke point, the unsaturated fatty acids break apart and recombine into a polymerized oil layer.
This cross‑linked film fills the sand‑cast pits and creates a smooth, hydrophobic surface that food can’t grip. The layer behaves like a food‑safe varnish, not a greasy film, so it stays dry and slick.
Each time you bake a light coat of grapeseed or shortening, you reinforce the network, making the non‑stick effect stronger. Uniform coverage matters; any bare spot exposes reactive iron and will cause sticking.
The result is a durable, self‑renewing seasoning cast iron surface that lasts for countless cooks.
Why a Thin Coat Outlasts a Thick One That Stays Tacky and Peels
The polymerized film you just built on the Lodge isn’t a one‑time miracle; it’s a living layer that gets stronger with each light bake. A thin coat seasoning method lets every molecule hit the 450‑500 °F oven window uniformly, so the oil fully cross‑links into a hard, matte surface.
When you wipe the pan almost dry before each hour, you avoid pools that trap cooler oil and leave a tacky, gummy film. Thick layers insulate the interior, causing the surface to scorch while the bulk stays semi‑liquid, which later peels or flakes.
Repeating thin coats builds a dense network that keys into the sand‑cast texture, reducing micro‑cracks and giving you a durable, non‑sticky finish.
Choosing the Right Oil: Smoke Point, Polymerization, and the Flaxseed Trap
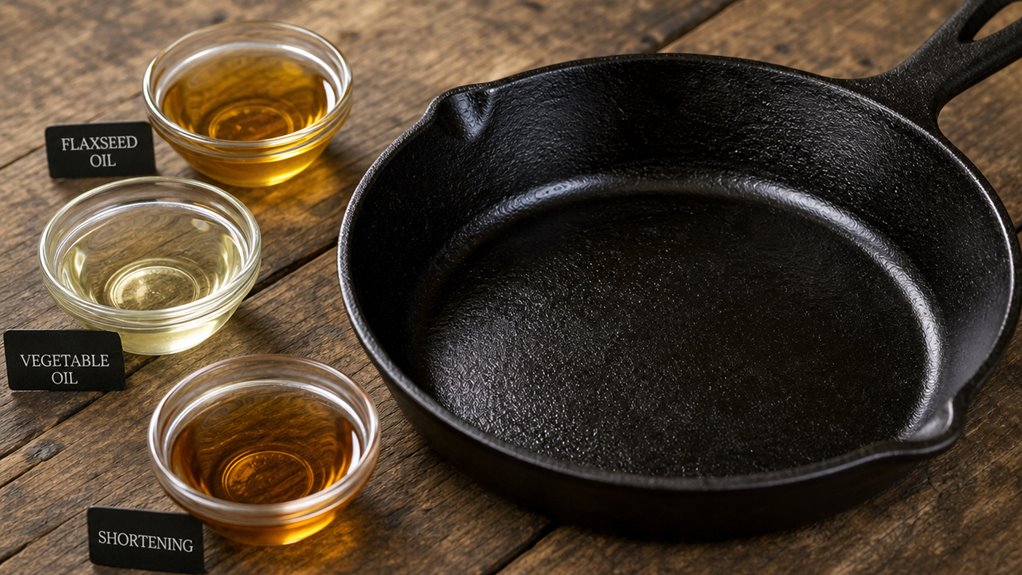
Smoke point and polymerization behavior determine which oils build a durable seasoning layer on cast iron, and choosing the wrong one leads to a brittle or flaking surface rather than a stable, non‑stick film.
Oils with higher smoke points, such as grapeseed and canola, stay stable through the typical 450 °F bake range, allowing each thin coat to polymerize without burning off prematurely.
Flaxseed oil polymerizes right at its low smoke point, which sounds efficient but produces a film that tends to flake rather than bond.
Lodge seasons with plain vegetable oil because it offers a reliable smoke point, consistent availability, and a straightforward composition without additive concerns.
The sections that follow examine how these factors interact across the full seasoning process.
Smoke Points Compared: Grapeseed, Canola, and Vegetable Shortening
Why compare smoke points at all? You’re heating the pan to 450 °F for a thin‑coat bake, and the oil must stay liquid long enough to polymerize without turning to smoke. Grapeseed oil sits around 420 °F, canola hovers near 450 °F, and vegetable shortening caps out near 360 °F. The higher the smoke point, the less you’ll see acrid fumes, but polymerization still depends on fatty‑acid makeup.
Grapeseed’s polyunsaturated linoleic acid can give a hard, glassy film that is great for a durable layer, though it can become brittle if you over‑apply. Canola’s monounsaturated balance makes it forgiving, while shortening’s saturated content stays solid, though it may need a longer bake to fully cross‑link.
Grapeseed oil: high PUFA, hard film, risk of brittleness
Canola oil: moderate smoke point, stable MUFA, easy to work with
Vegetable shortening: low smoke point, saturated, slower polymerization
Why Lodge Pre-Seasons With Vegetable Oil Instead of a Boutique Blend
Lodge’s factory line runs a single, thin coat of soy‑based vegetable oil over every new skillet and bakes it at about 460 °F.
You get a neutral flavor and a cheap, widely available oil that stays stable on shelves. The thin coat polymerizes just enough to seal the sand‑cast surface without turning brittle, and the process repeats reliably across thousands of pans.
Boutique blends would introduce batch‑to‑batch variation and supply‑chain headaches, plus they often contain higher saturated fats that can go rancid in inventory. Soy‑based oil also avoids animal‑fat allergens and fits vegan expectations, keeping the pre‑seasoning simple, cost‑effective, and consistent for the average home cook.
Why Grapeseed Oil Builds a Tougher Layer Than Flaxseed Over Time
A thin coat of grapeseed oil will hold up longer than the same coat of flaxseed because its smoke point and polymerization balance are better suited to the 425‑475 °F seasoning window.
Grapeseed oil reaches its smoke point near 420 °F, so it oxidizes steadily instead of burning.
The semi‑drying fatty acids create a cross‑linked network that stays flexible, while flaxseed’s ultra‑high omega‑3 content hardens too quickly, producing a brittle film that cracks under repeated heat cycles.
Over time the grapeseed layer tolerates stovetop searing and utensil scrapes without flaking, and you’ll need far fewer full‑reseason sessions.
- Smoke point aligns with oven window
- Polymerization yields tough, flexible film
- Less brittleness, fewer micro‑cracks after use
The Step-by-Step Method to Season Cast Iron in the Oven
Seasoning cast iron in the oven means building a thin, bonded layer of polymerized oil directly onto the metal surface through controlled heat.
A temperature range of around 450 to 500 degrees Fahrenheit drives the oil to cross-link properly, creating a coating that resists sticking and holds up through repeated use.
A bare Lodge skillet typically benefits from three to four coats, with each layer applied as thinly as possible and baked for roughly an hour before the next is added.
Keeping the coats thin is critical, because heavy applications can pool, cure unevenly, and produce a flaking surface rather than a durable finish.
The sections that follow cover the full process in detail.
The 450-500F Polymerization Window and Why Timing Matters
When you heat a pan to 450‑500 °F, the oil you’ve brushed on finally passes its smoke point and starts to polymerize, turning liquid fat into a solid, cross‑linked film that bonds to the iron’s porous surface.
This is the sweet spot for seasoning cast iron, because the oven temperature for seasoning cast iron must exceed the oil’s smoke point long enough to drive free‑radical cross‑linking.
A full hour at that temperature lets the film cure through the thin coat, anchoring into the sand‑cast texture.
Cooling inside the turned‑off oven lets the polymer settle without shock, preventing micro‑cracks.
- Aim for 450‑500 °F, about 25 °F above your oil’s smoke point.
- Hold the pan for roughly one hour to guarantee complete polymerization.
- Let the oven cool with the pan inside to stabilize the new layer.
How Many Thin Coats a Bare Lodge Skillet Actually Needs
Seasoning a stripped Lodge skillet isn’t a one‑coat miracle; the iron needs a series of ultra‑thin layers to lock in a durable polymer film.
You’ll want at least three very thin coats to build a solid base, sometimes four if the surface looks patchy after the first round.
Each coat uses roughly a quarter to a teaspoon of high‑smoke‑point oil, such as grapeseed or vegetable shortening, spread inside, outside, and on the handle, then wiped to a faint sheen.
Bake the pan upside‑down at 450‑500 °F for one hour, let it cool in the closed oven, and repeat.
This routine avoids the flaking that comes from six or eight heavy coats, giving you a resilient, low‑maintenance finish.
How to Keep Seasoning From Rusting, Stripping, or Turning Sticky
Keeping cast iron seasoning intact depends on controlling moisture, heat, and oil application at every stage of pan care. Bare iron corrodes quickly when exposed to humid air, so thorough drying after washing removes the surface moisture that triggers rust.
A brief session on the stovetop or in an oven set to around 200 °F drives out water that towel-drying alone can miss. Applying a thin coat of high-smoke-point oil after each wash then seals the iron against air contact, while excess oil left on the surface polymerizes unevenly and produces sticky buildup over time. The details of how each variable interacts reward closer examination.
Washing, Drying, and the Light-Oil Habit That Blocks Rust
In the kitchen, a quick rinse with warm water and a soft sponge does the trick without chewing away the polymerized film you’ve built. Warm water lifts food; a non‑abrasive scrubber protects the seasoning.
For stubborn bits, a pinch of coarse salt works like a gentle sandpaper. After rinsing, dry immediately with a lint‑free towel, then place the pan on low heat for five minutes to evaporate hidden moisture.
While it’s still warm, apply a half‑teaspoon of high‑smoke‑point oil, spread thinly, and buff until no oil transfers. This light‑oil habit seals the surface and blocks rust.
- Use a soft sponge, not steel wool, to protect the seasoning.
- Dry on the stovetop briefly to avoid flash rust.
- Apply a razor‑thin coat of oil while the pan is warm for the light‑oil habit.
Whether a Little Soap Really Destroys Cast Iron Seasoning
A quick rinse with warm water and a splash of modern dish soap won’t magically strip the polymerized layer you’ve built. Just don’t let it sit.
Modern soap is formulated as a degreaser, not a lye‑based stripper, so a brief wash won’t ruin cast iron seasoning. Use it when stubborn residues or strong odors linger, especially after fish, spicy sauces, or sweet desserts.
Rinse quickly, then dry the pan thoroughly; moisture is the real enemy, not the soap. After drying, wipe a thin coat of high‑smoke‑point oil to seal the surface and prevent stickiness.
Avoid harsh cleaners, dishwasher cycles, and long soaks. In short, soap and seasoning compatibility is fine, provided you keep the pan dry and re‑oil promptly.
When to Strip and Re-Season Versus Just Maintaining the Layer
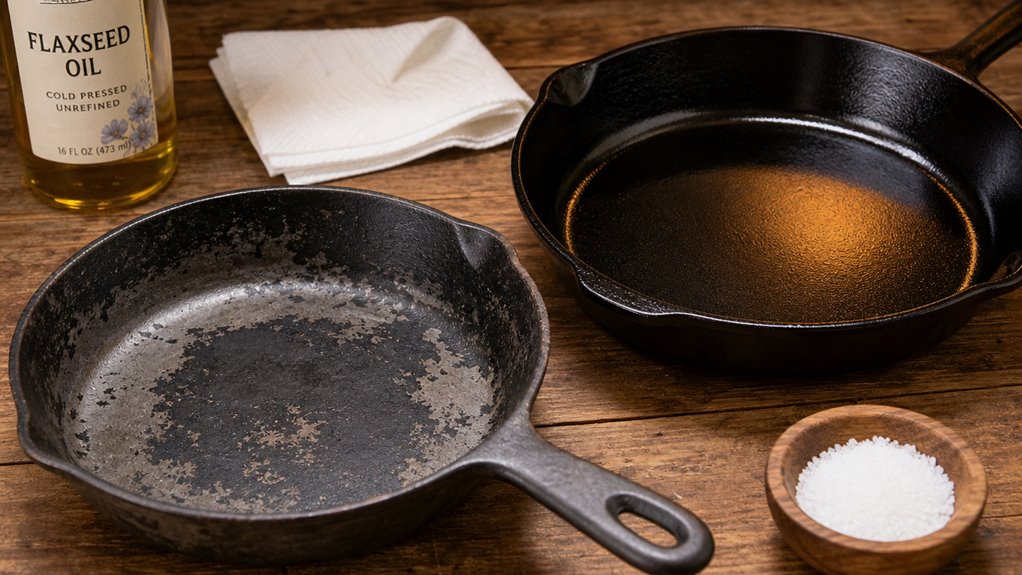
Stripping and re-seasoning cast iron becomes necessary when bare-metal patches, a gray haze covering a significant portion of the surface, or flaking coating signal that the existing layer can no longer protect against rust or sticking. Light surface rust or minor grime often responds to a brief vinegar soak followed by a thin-coat oil bake, which restores the seasoning without requiring a full strip.
When deterioration goes deeper, particularly when the coating smells off or bare spots are widespread, partial fixes tend to fail, making a complete strip the more reliable path. The condition of the seasoning layer shapes every outcome, because a compromised base affects how evenly new polymerized oil bonds to the metal. The sections ahead cover how to assess that condition and act on it correctly.
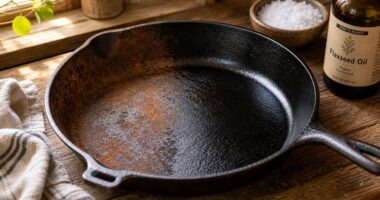
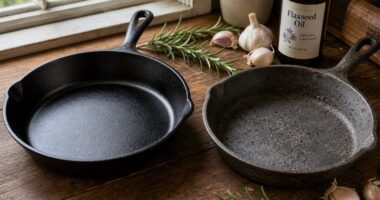
Reading the Surface: Matte Black, Gray Haze, and Bare Metal Spots
Matte black across the entire cooking surface tells you the seasoning is solid and fully polymerized, so you don’t need to strip anything. You can keep it by cleaning, drying, and wiping a ultra‑thin oil layer while warm.
If you see a light gray haze, it means the coating is thinner in that spot but still intact; a quick deep clean and one or two light passes of oven seasoning will restore it.
Bright silver islands expose bare iron; spot‑season them if they’re isolated, but if they’re widespread you’ll have to strip and re-season the pan.
- Uniform matte black → maintain only
- Gray haze → deep clean + thin oven coats
- Bare metal spots → spot‑season or full strip depending on coverage
When a Vinegar Soak Is Enough and When Electrolysis Earns Its Setup
When the pan shows only a few light rust spots after a quick wash, a short vinegar soak can usually dissolve the corrosion without hurting the underlying seasoning; just mix two parts hot water with one part white distilled vinegar, let the pan sit for up to an hour, and pull it out the moment you see bubbling. Those bubbles mean the acid is attacking the iron itself.
A vinegar soak works for surface rust; after it, scrub with steel wool, wash, dry, and apply a thin oil film before a regular 450‑500 °F bake.
If rust is deep, patchy, or persists after scrubbing, the vinegar method won’t suffice.
In those cases, set up an electrolysis bath: a battery charger, a sacrificial steel anode, and a basic of water with a bit of washing soda.
Electrolysis removes stubborn rust without scraping away the entire seasoning, but it requires careful monitoring and a safe, ventilated space.
Use it only when a simple vinegar soak and routine maintenance can’t restore the pan’s surface.
Frequently Asked Questions
How Many Coats Are Optimal for a Sand‑Cast Lodge Pan?
Building good seasoning is a layering process: you need three to four ultra‑thin coats on a sand‑cast Lodge. Apply each, bake, cool, then repeat, which builds durability without sticky buildup.
Can I Use a Stovetop‑Only Method for a Durable Layer?
Yes, you can build a durable layer on the stovetop if you keep each coat ultra‑thin, heat the pan past 400°F, wipe off excess, and repeat 3‑6 times, rotating for even coverage.
Does Pre‑Heating the Pan Affect Polymerization Quality?
You’ll see better polymerization when you pre‑heat: you’ll dry the surface, you’ll expand pores, you’ll avoid steam pockets, and you’ll achieve a uniform, durable coating.
What Temperature Range Is Safe for Re‑Seasoning After a Rust Episode?
You should keep the oven between 375 °F and 500 °F after rust removal; 400‑450 °F works best for most oils, staying below 500 °F to protect the pan’s structure.
How Does Cooking Fat Contribute to Layer Renewal Over Time?
Think of each sizzle as a tiny repair crew. Your cooking fat polymerizes at high heat, forming a fresh, ultra‑thin polymer film that bonds to the iron, gradually rebuilding a durable, self‑healing seasoning layer.
Conclusion
You’ve got a solid, polymerized layer that will survive dozens of meals without turning sticky, and it only costs a few dollars in oil. If you worry the oven method will waste time, remember each bake is just an hour and you can do it while the house is empty. The result is a pan that heats evenly, resists rust, and needs only a quick wipe after cooking. Keep the surface dry, avoid abrasive scrubbers, and the seasoning will keep doing its job for years.
Michael Haralson is an author, analyst, and founder of MHaralson, a publishing company. He spent five years with a San Diego catering company, cooking for events of up to 600 guests and working part-time in the main kitchen. He writes about the balance between kitchen tools that cost too much and those that fail too soon.